Secure task management in a state-of-the-art environment
You can now create, share and manage your tasks from and into your Geens private data store. The tool is safe and secure because it is built with the Geens SDK making full use of the Geens end-to-end encryption and its privacy by design development approach.
Like the daily paper to-do list we make every day to keep track of tasks we need to complete, an online task management system is a digital tool that helps us manage and organize our tasks in a more efficient and streamlined way.
The to-do list is a simple yet effective metaphor for a task management system, as it allows us to prioritize tasks, set deadlines, and track progress. Similarly, Geens My Tasks allows us to manage our tasks in a more structured way, assign tasks to team members, and monitor progress.
A to-do list helps us to avoid forgetting tasks or missing deadlines, which is also a key benefit of using an online task management system. With Geens My Tasks, tasks can be assigned and monitored in real-time anywhere, ensuring everyone is aware of what needs to be done and when it needs to be finished.
Finally, just as a to-do list can help us feel more organized and in control of our daily activities, Geens My Tasks can help teams to be more in control of their projects and workloads. This leads to increased productivity and a greater sense of accomplishment at the end of the day.
In the Geens My Tasks management system, Geens users can create a secure private room. In this room, they collaborate with others to complete tasks and monitor the progress. In optional sub-tasks, you can focus on details or separate issues required for the completion of the main task. Progress and Status are tracked in the room’s dashboard.
Geens My Tasks will improve and add value to any organization in various ways:
• Improves productivity: tasks prioritization and streamlining workflow enable employees to focus on the most important tasks first. This improves productivity and ensures deadlines are met.
• Increases collaboration: features such as comments, file sharing, and task assignment allow team members to work together more efficiently and communicate more effectively.
• Better project insights: managers and team members monitor the status of tasks and projects in real-time. This provides better insight into project progress and allows faster decision-making and problem-solving.
• More efficient resource allocation: organizations allocate resources more efficiently by providing a clear overview of workload and availability. This may prevent an employee overload and ensure resources are used effectively.
• Improved accountability: managers keep track of the progress of individual tasks and identify any potential problems or delays. This ensures better accountability and allows any timely corrective action if necessary.
• Enhanced customer satisfaction: by improving productivity, collaboration, and efficiency, such a system will lead to better (customer) experience. The tasks and projects are completed with a higher level of quality: more effective use of resources, better collaboration, clear communication and efficient monitoring.
Get more trusted work done as a team
End-to-end encryption is a security measure that ensures that only the sender and intended recipient of a message or task can access the contents. By using end-to-end encryption in a task management system, teams can have increased confidence in the security and privacy of their communication and work.
When team members know their tasks and messages are encrypted and can only be viewed by the intended recipients, they are more likely to share sensitive information and collaborate more openly. This increased collaboration can lead to more work being done by the teams.
Furthermore, end-to-end encryption helps to prevent unauthorized access to tasks and information. This reduces the risk of data breaches and cyber attacks, which may disrupt work and cause downtime.
In addition, end-to-end encryption can help to build trust between team members, as they know that their communication and work is secure and private. This can lead to a more positive work environment and improved team morale, which can in turn boost productivity and lead to more work being done.
Using the end-to-end encrypted Geens My Tasks, it guarantees more work is done by the teams due to increased collaboration, improved security, and stronger trust between internal and external team members.
ROOMS
Description
Like in real life, rooms are places where people come together with a mutual purpose or interest. The Geens Rooms are designed to facilitate secure and private data exchange. By combining task management, chat, file transfer and data store in one secure place within the Geens environment, a unique collaboration tool is created.
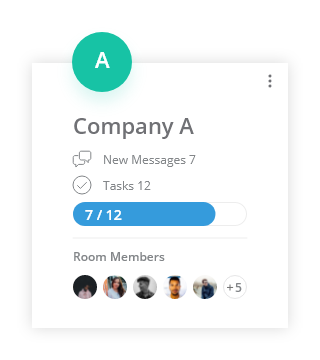
A Geens Room can be managed by a few or by large groups of hundreds of people. The room owner can invite members and revoke access or change permissions over time. Rooms and Invitations are managed by “cards” in the My Task main menu:
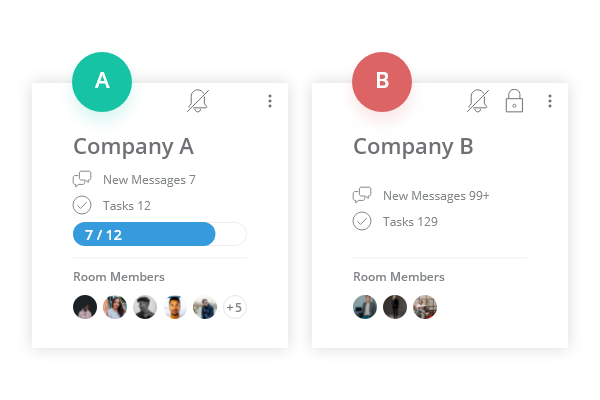
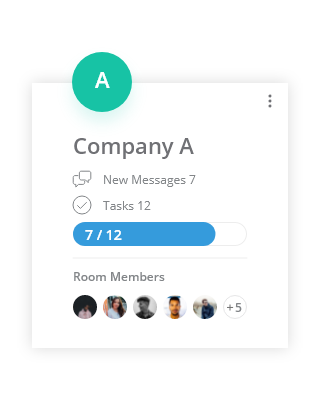
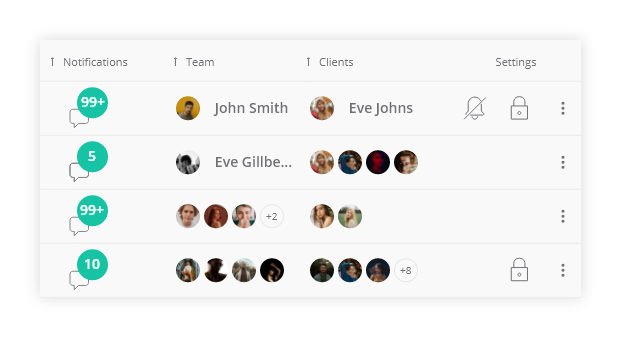
Room Cards contain:
• Avatar
• Lock, Mute indications
• Number of new messages
• Amount of tasks
• Progress of sub-tasks
• Room members list
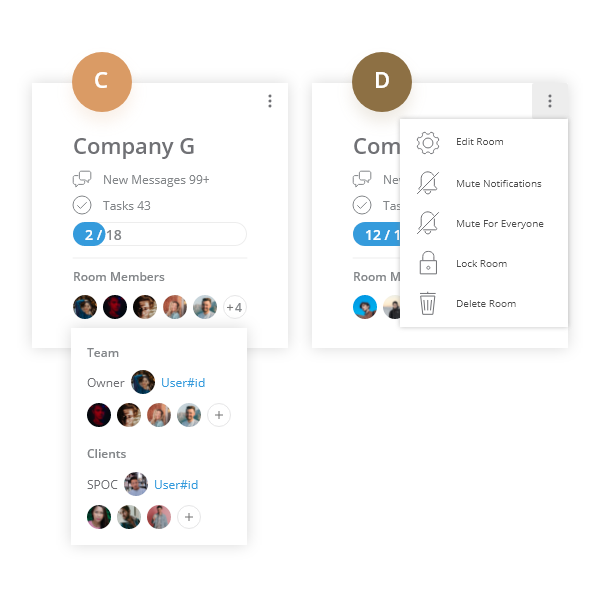
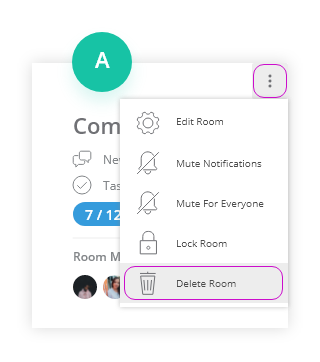
Room Cards options:
• Edit Room
• Mute Notifications
• Mute For Everyone
• Lock Room
• Delete Room
Set up, and then manage your Room
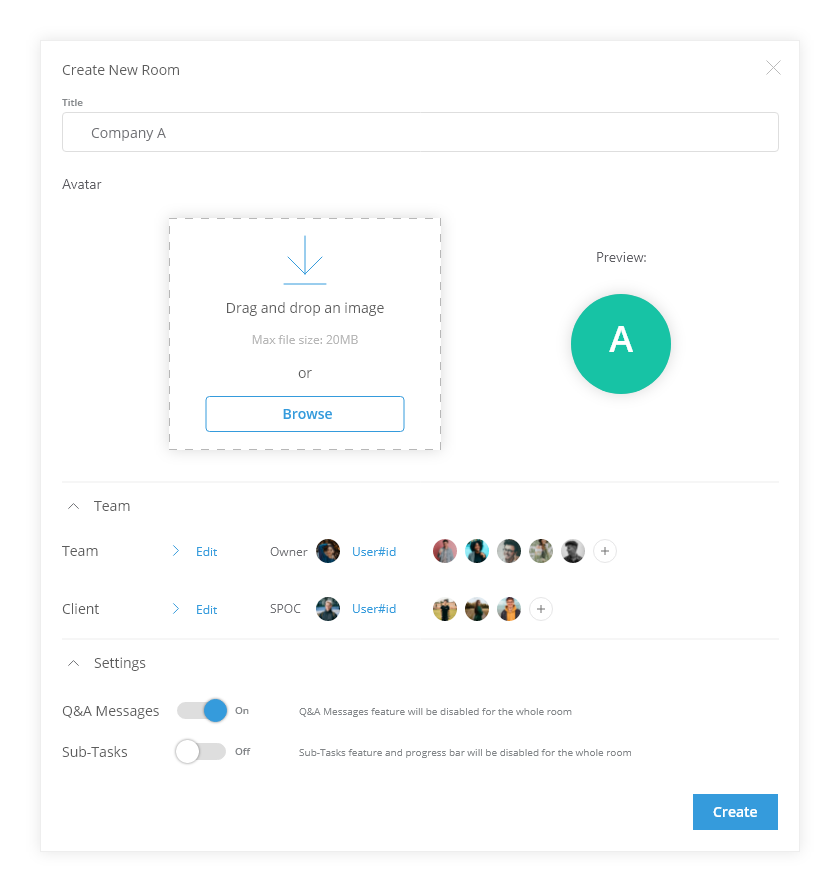
To create a new room, go to My Task in the main menu and click ‘+ Add room’ in the top right corner. The Create New Room pop-up is shown.
Here you can set:
• The title of the room (250 characters maximum);
• The room avatar (only JPG, PNG and GIF maximum of 20 MB files are supported);
• Manage the users in both your own and the client’s team (external) and set their permissions;
• Manage general Room settings (your selection applies to the entire room).
Room User management
• Any user can be invited to a room. You can use the #id to invite user; already invited a users will pop up automatically to easily select members
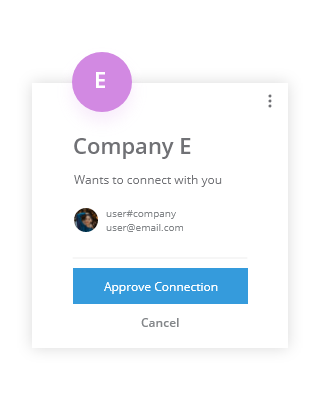
• Approve or decline an invitation to a room: members have to accept the invitation to a room
|
Room Card Example |
Room Invitation Example |
 |
 |
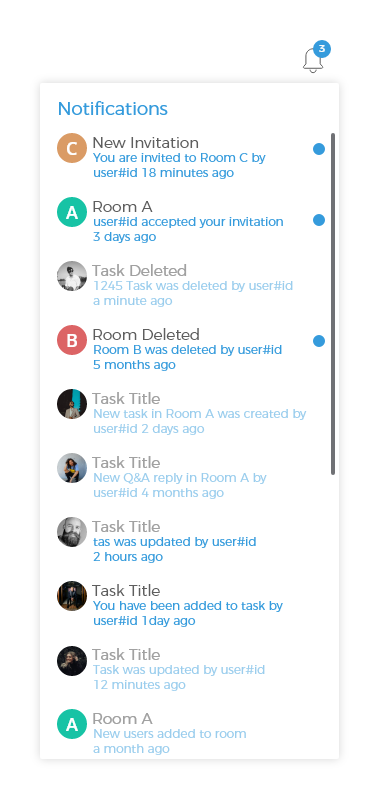
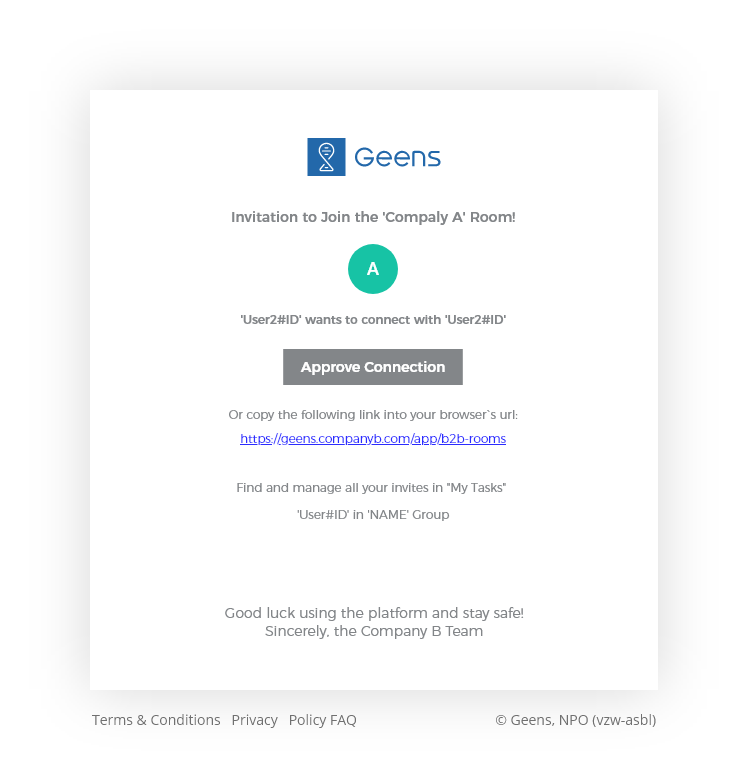
Invited users will receive an email and/or dashboard notification depending on their local and general environment settings.
|
Dashboard Notification |
Email Room Invitation |
 |
 |
Types of users
Select for which team in the Room you are inviting users.
In Rooms, there are two types of teams: My Team or the Client Team.
The difference between these two teams is that the Client Team is limited in its features:
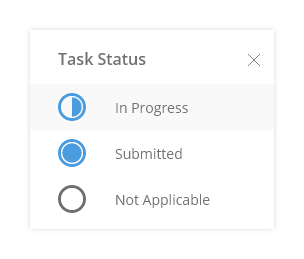
• Client Team users can change the task status only to 3 options (In progress, Submitted or Not applicable), where My Team users can set the task status to the full list of 9 options.
• Client Team users cannot change settings such as the Rooms settings.
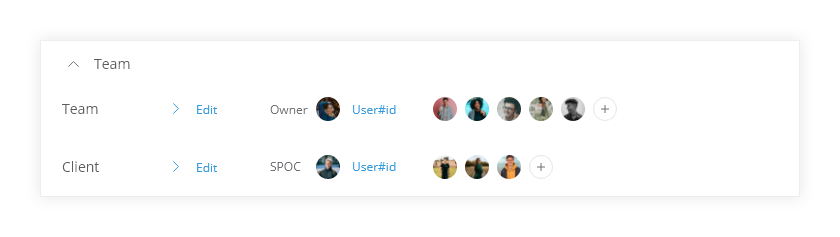
-
Team
- Owner – the user who created the room and invited other users. This user has ownership of all data and resources in this room.
- Team users – everybody else in your team.
-
Client
- SPOC – the “Single Point Of Contact” (SPOC) for the Client Team. This is the main administrator of the Client Team. The SPOC assigns users to tasks, edits user permissions etc. This does not imply he has access to all tasks, communication and data.
- Team users – everybody else on the client team side.
-
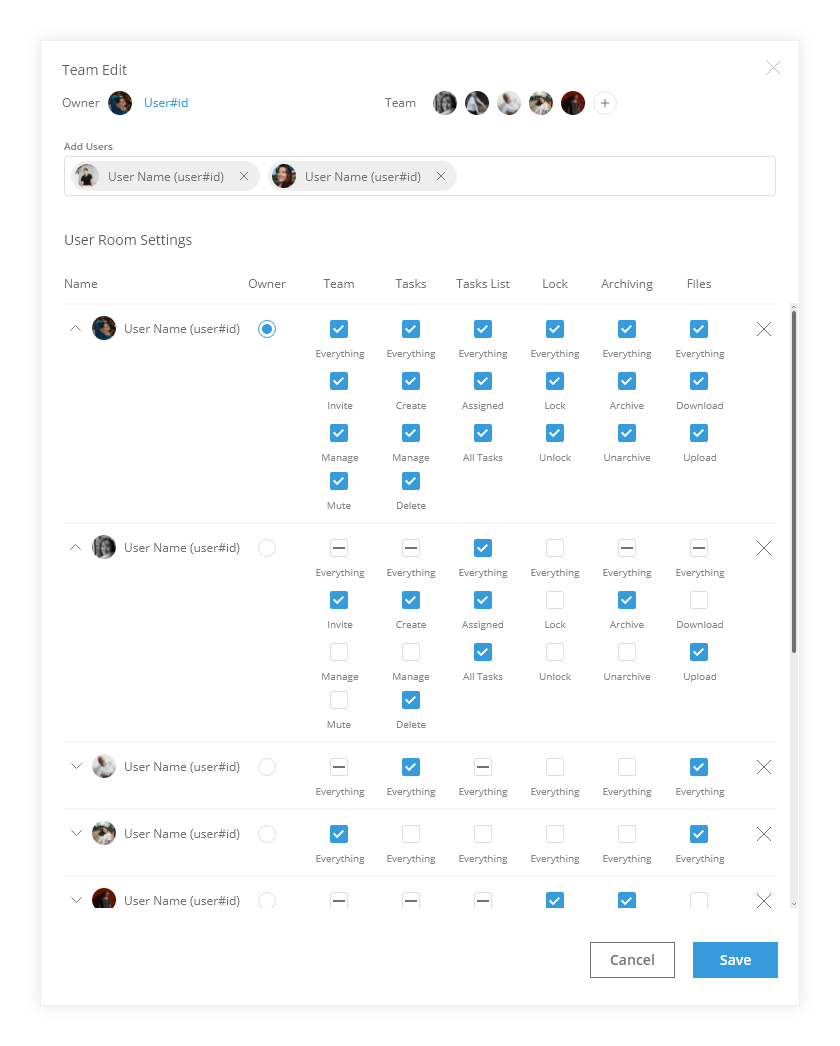
Permissions
- Owner – Room can have only one owner.
- SPOC – Client Team can optionally have one SPOC.
- Team:
Invite – permission to invite new users to the room.
Manage – permission to manage users in the room and tasks, assign, remove. - Tasks:
Create – permission to create new tasks.
Manage – permission to manage existing tasks, change settings, status etc.
Delete – allows tasks deletion from a task list. - Task list:
Assigned – displays only assigned tasks to the user.
All tasks – displays a full list of tasks (only assigned tasks can be opened). - Lock:
Lock – allows only to lock the task.
Unlock – permission to unlock the tasks. - Archiving:
Archive – allows only to archive the tasks.
Unarchive – permission to unarchive the tasks. - Files:
Download – allows downloading the files from the tasks.
Upload – allows uploading files to the task.
Everything – upload, download and manage files (rename, move, copy, delete etc.) in the task.
The permissions overview offers an overview of all permissions related to the role. The permissions of members in the room can be tailored to specific requirements within the team.
-
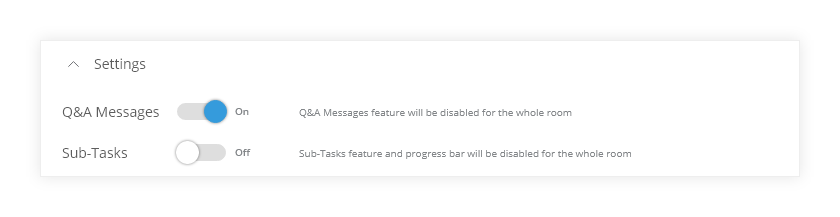
Room settings
Two important general settings for the Room:
-
- Q&A messages can be disabled for the whole room (room chat is no longer available for all users).
- The use of Sub-Tasks can be disabled for the whole room (this is also very specific to the goal of the room; for project management, it is very useful to split general tasks into sub-tasks (with similar capabilities) to maintain a better overview.
Learn more about Sub-Tasks and Q&A.
TASKS
Description
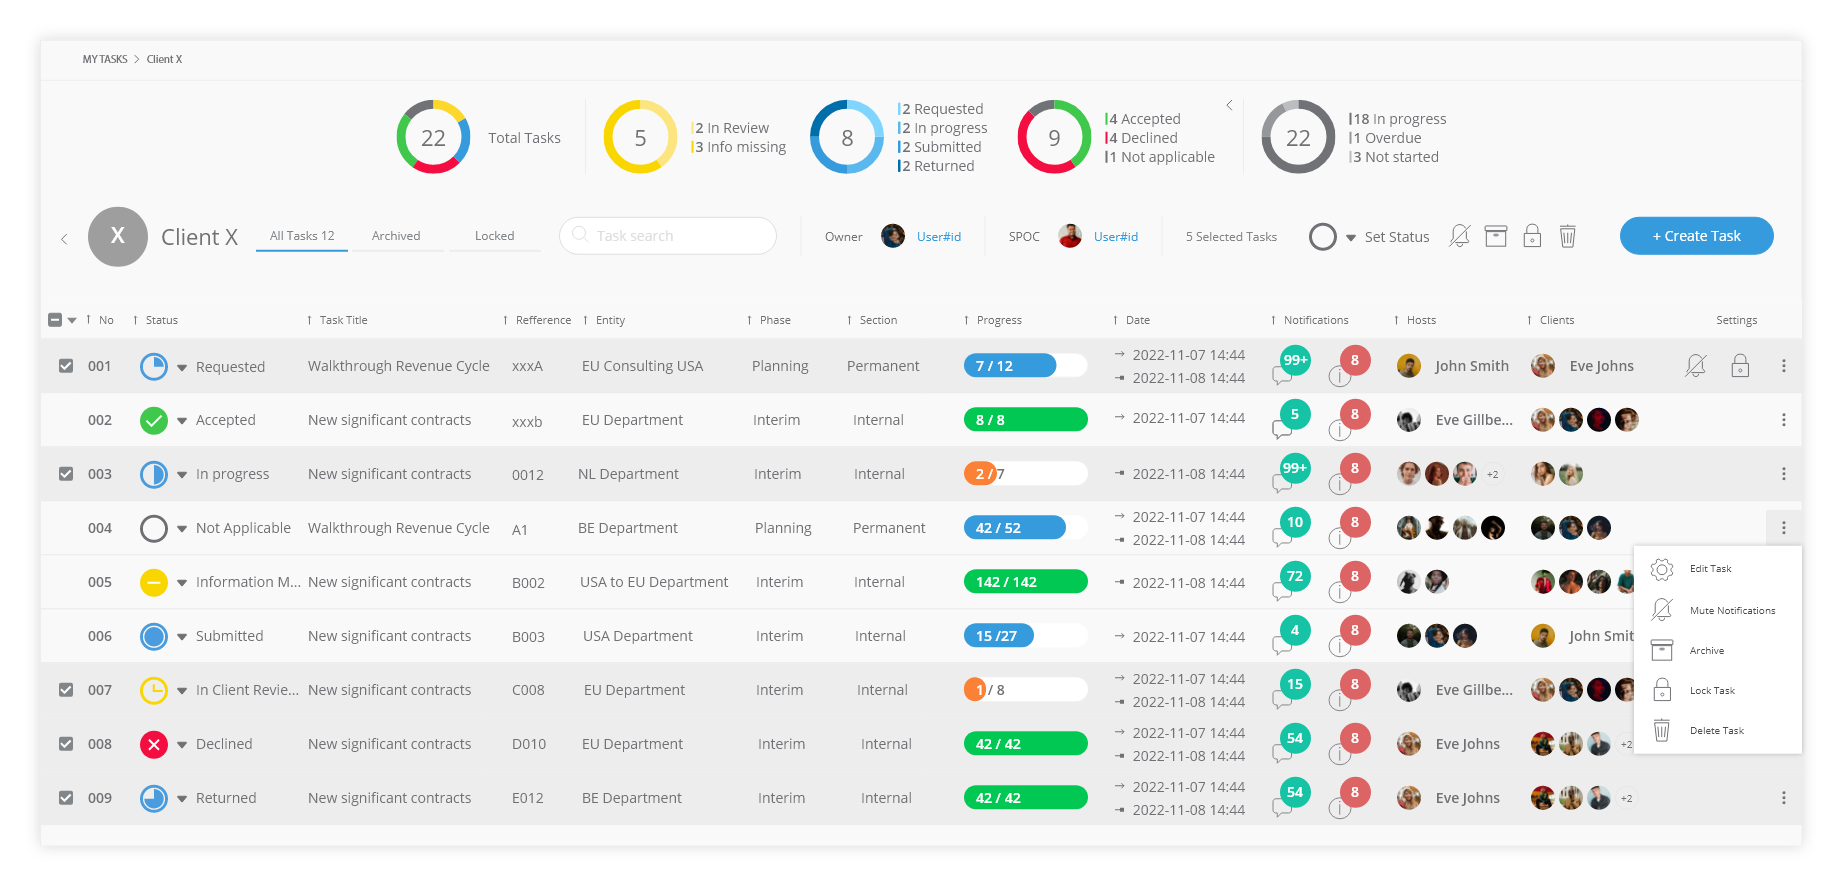
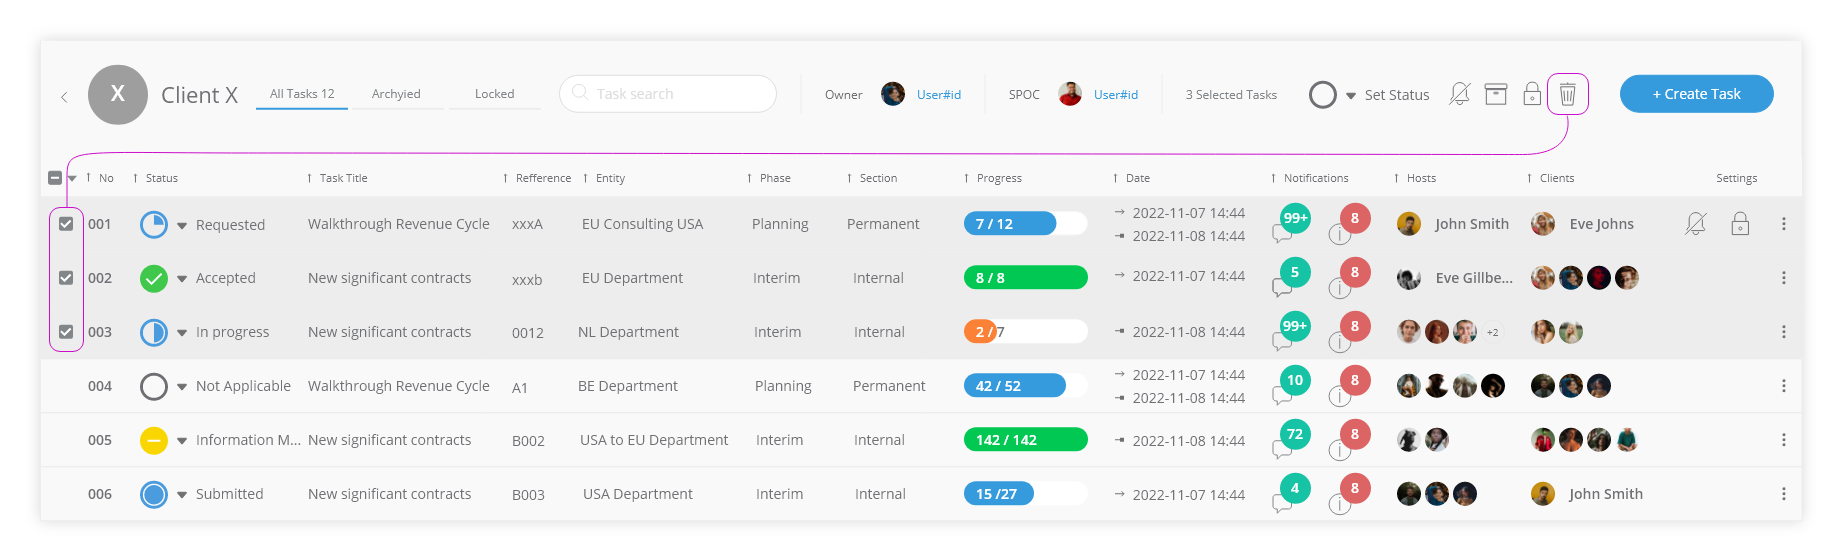
When users enter the room, they get an overview of the tasks list.
Task List UI Breakdown:
• Breadcrumb navigation assistant;
• Task management visuals;
• Sub-menu for All (active) Tasks, Archived and Locked tasks;
• Task search/Filter: search words on Status, Descriptions and User IDs
• Owner and SPOC avatar and name;
• Multi-select to change tasks attributes: Mute, Archive, Lock, Delete;
• A list of all active tasks: Numbering, Details, Sub-task progress, Date indication, Q&A/Sub-task Notifications, User list, Task Settings and attributes.
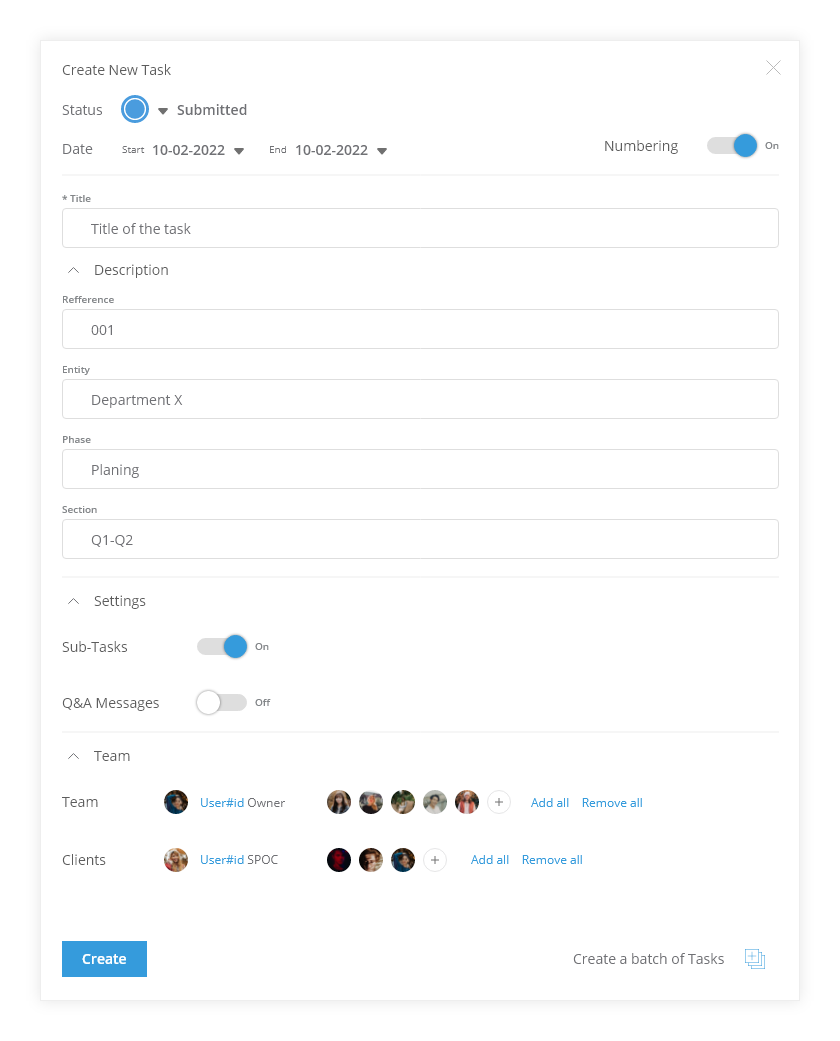
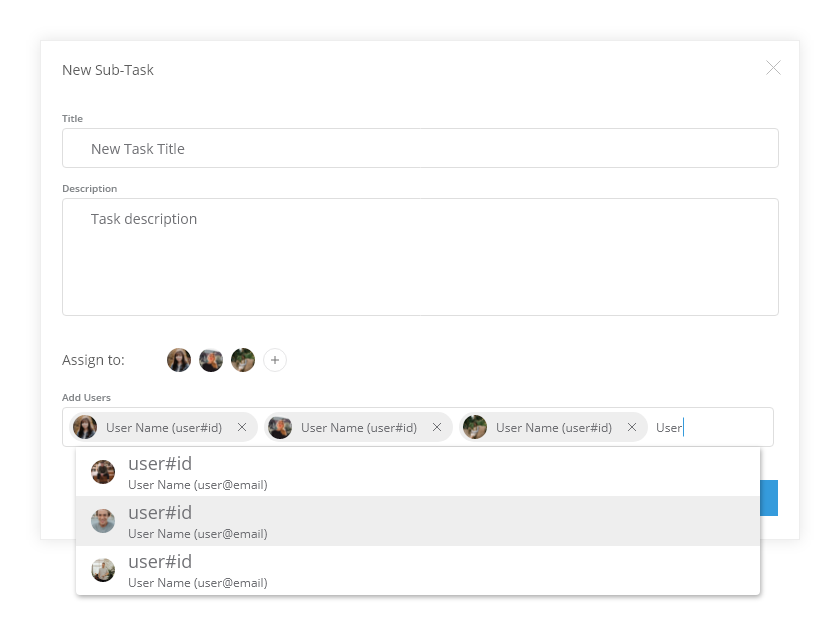
Create & Edit Tasks
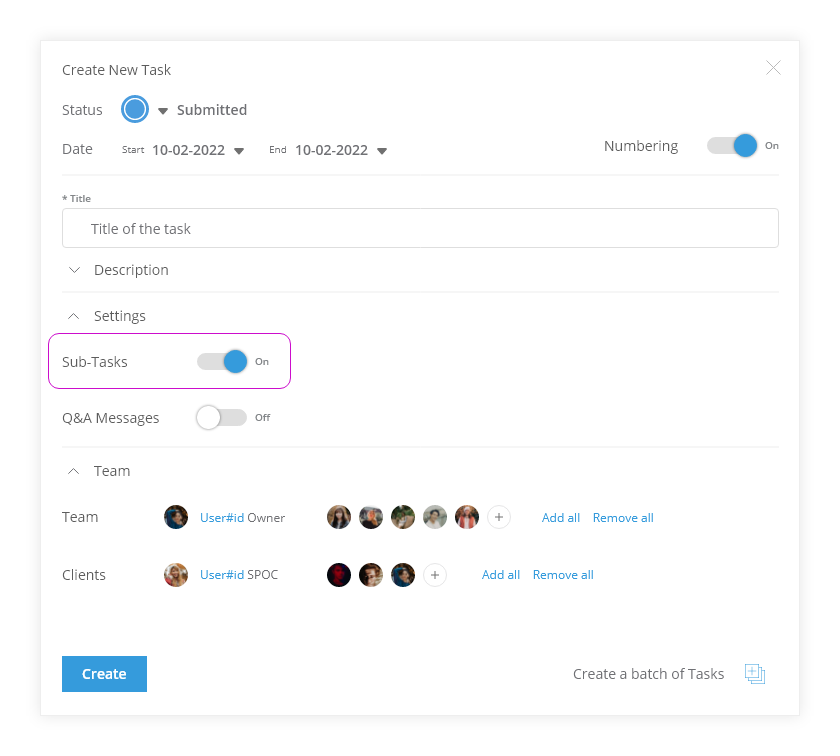
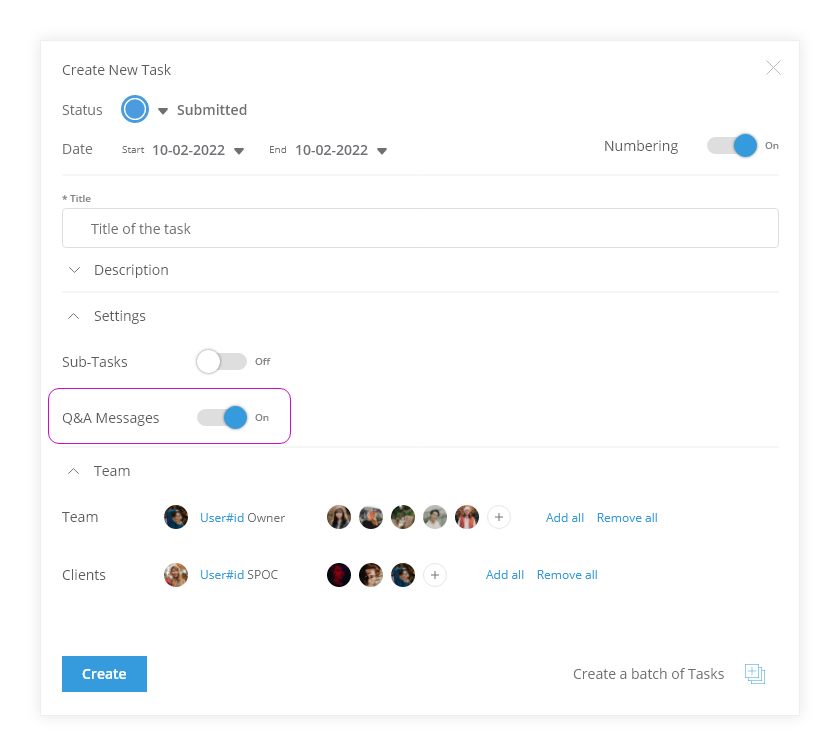
To create a new task, click ‘+ create task’ in the top right corner. The Create New Task window pops up. Here you can set description, details, general settings and assigned users.
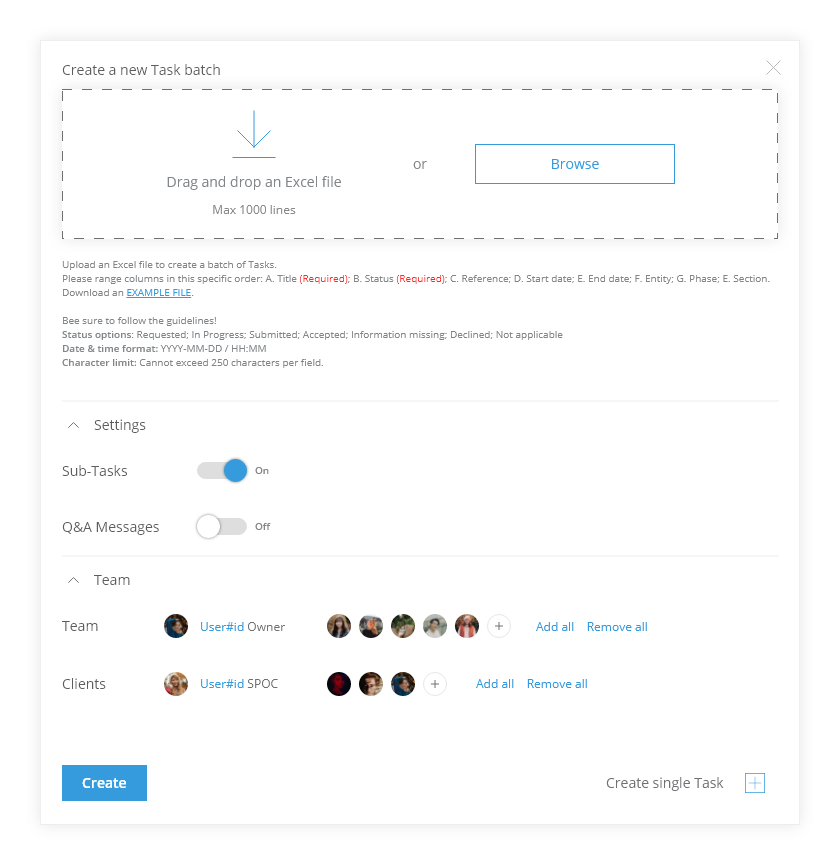
It is also possible to create a standard set of tasks via the Batch task creation.
With the use of an Excel spreadsheet, several tasks can be created in one batch. An empty spreadsheet template “EXAMPLE FILE” can be downloaded.
The Batch task creation spreadsheet must meet following guidelines:
Column order: A. Reference; B. Status; C. Title; D. Start date; E. End date; F. Entity; G. Phase; E. Section.
Status options: Requested; In Progress; Submitted; Accepted; Information missing; Declined; Not applicable.
Date & time format: YYYY-MM-DD / HH:MM.
Character limit: Cannot exceed 250 characters per field.
| NOTE: a maximum of 1000 entries is allowed per batch. Settings such as Sub-Tasks, Q&A Messages and assigned users will be applied to all batch tasks. |
|
Create task |
Batch task creation |
 |
 |
Task user assignment management
You can easily assign users to or remove users from tasks. Only users that are fully onboarded in the room can be assigned to the tasks. When clicking the Add Users box, a list of onboarded users will automatically pop up and you can easily select the correct user.
To remove a user form a task, use the ‘X’ after the #id.
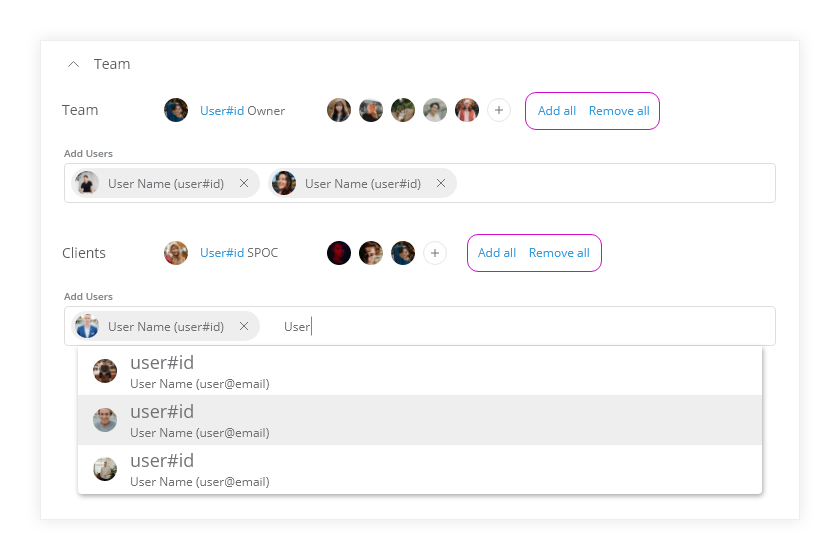
| NOTE: you can use the function Add all / Remove all to quickly add or clean users from one of the teams lists. |
In the main overview of the tasks, all assigned users are listed under their team. If a user is not assigned to the task, the person is not shown in the list.
| NOTE: you can change a permission for users to see/hide the full task list. If the user’s permission is set to see the full list, the user can see all tasks but not open and view the contents of the task until the user is assigned to the task. |
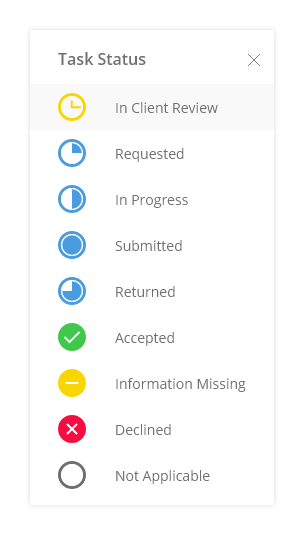
Statuses
The following statuses are standard in the application:
|
Team Task status options |
Client Task status options |
 |
 |
Team Task status options: In Client Review, Requested, In Progress, Submitted, Returned, Accepted, Information Missing, Declined, Not Applicable.
Client Task status options: In Progress, Submitted, Not Applicable.
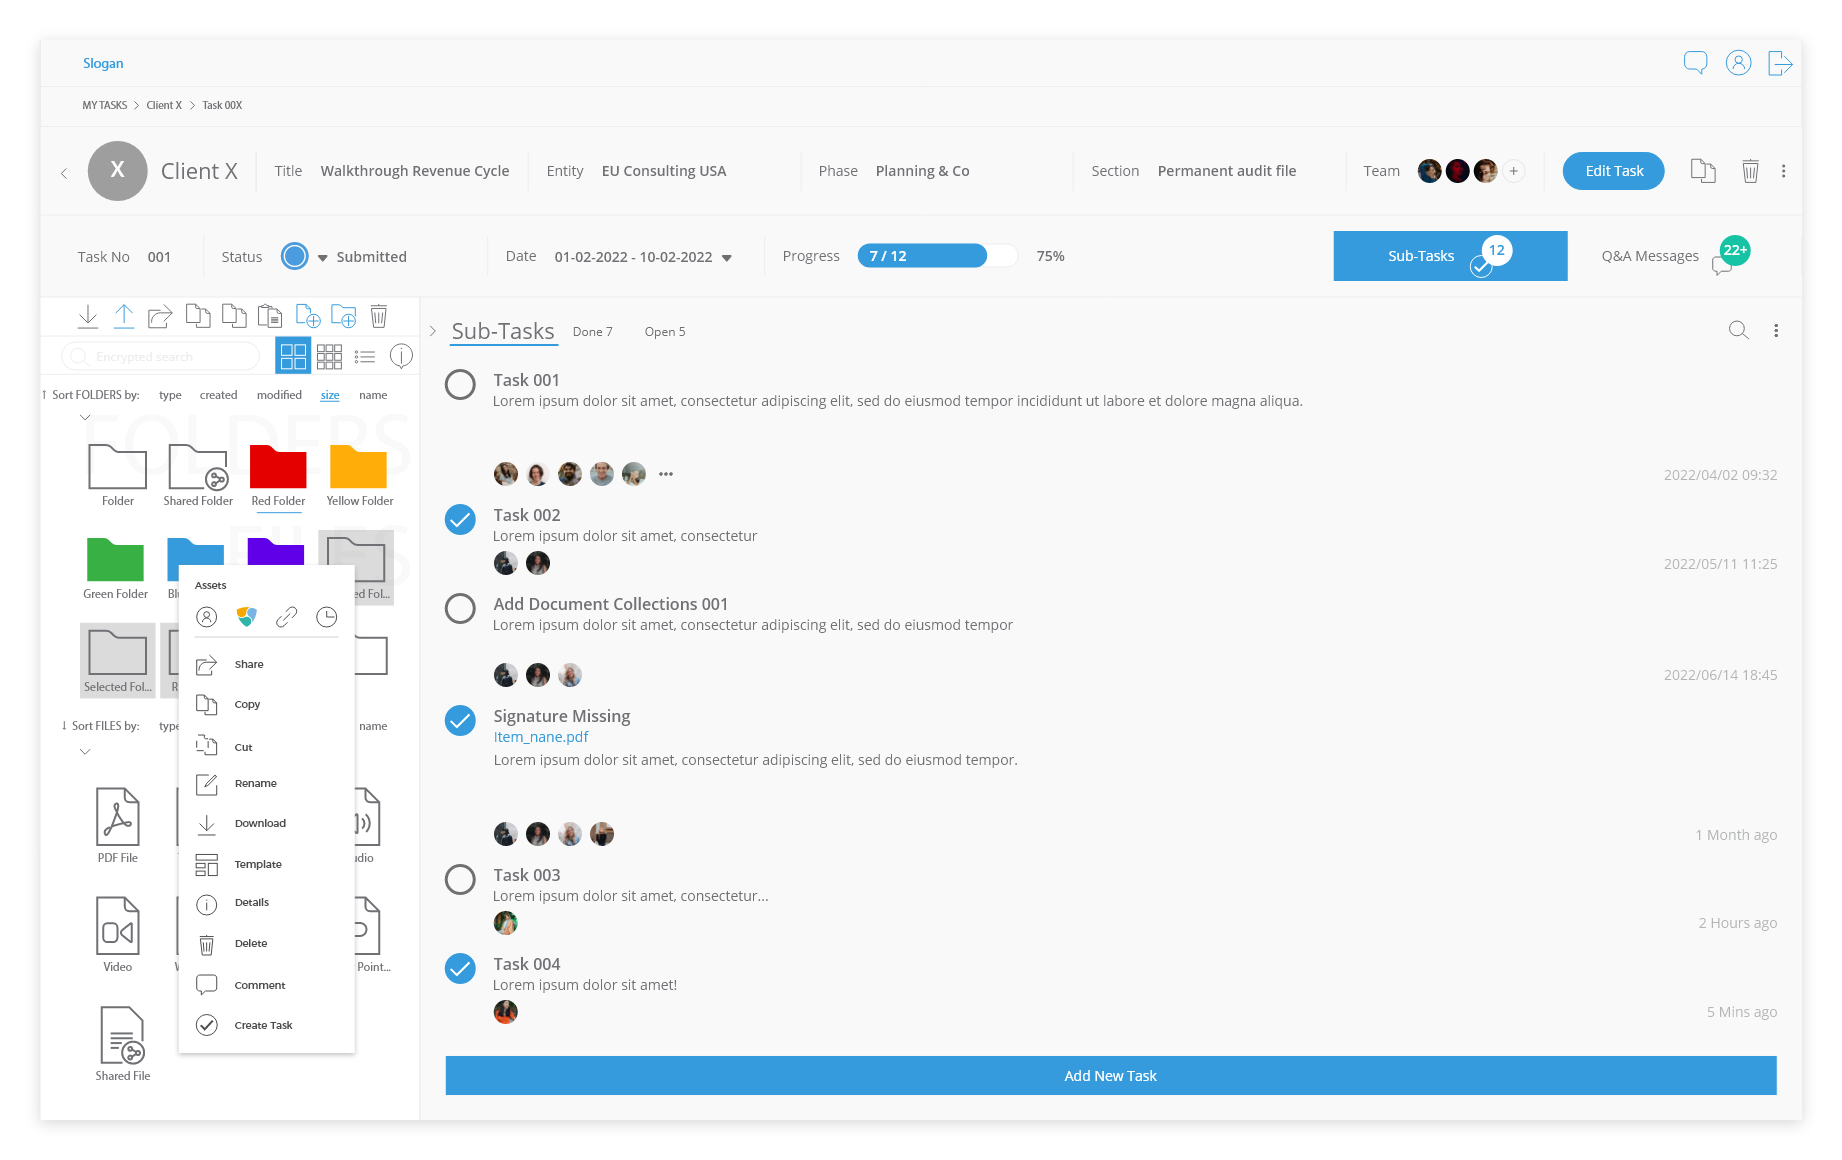
TASK OVERVIEW
The task overview is an excellent tool to see all the details of the tasks in different ways.
Task List UI Breakdown:
- Breadcrumb navigation assistant;
- Owner/SPOC details descriptions;
- Task team;
- Task edit/settings;
- Task number, status, date, progress details;
- Sub-tasks overview;
- Q&A messages overview.
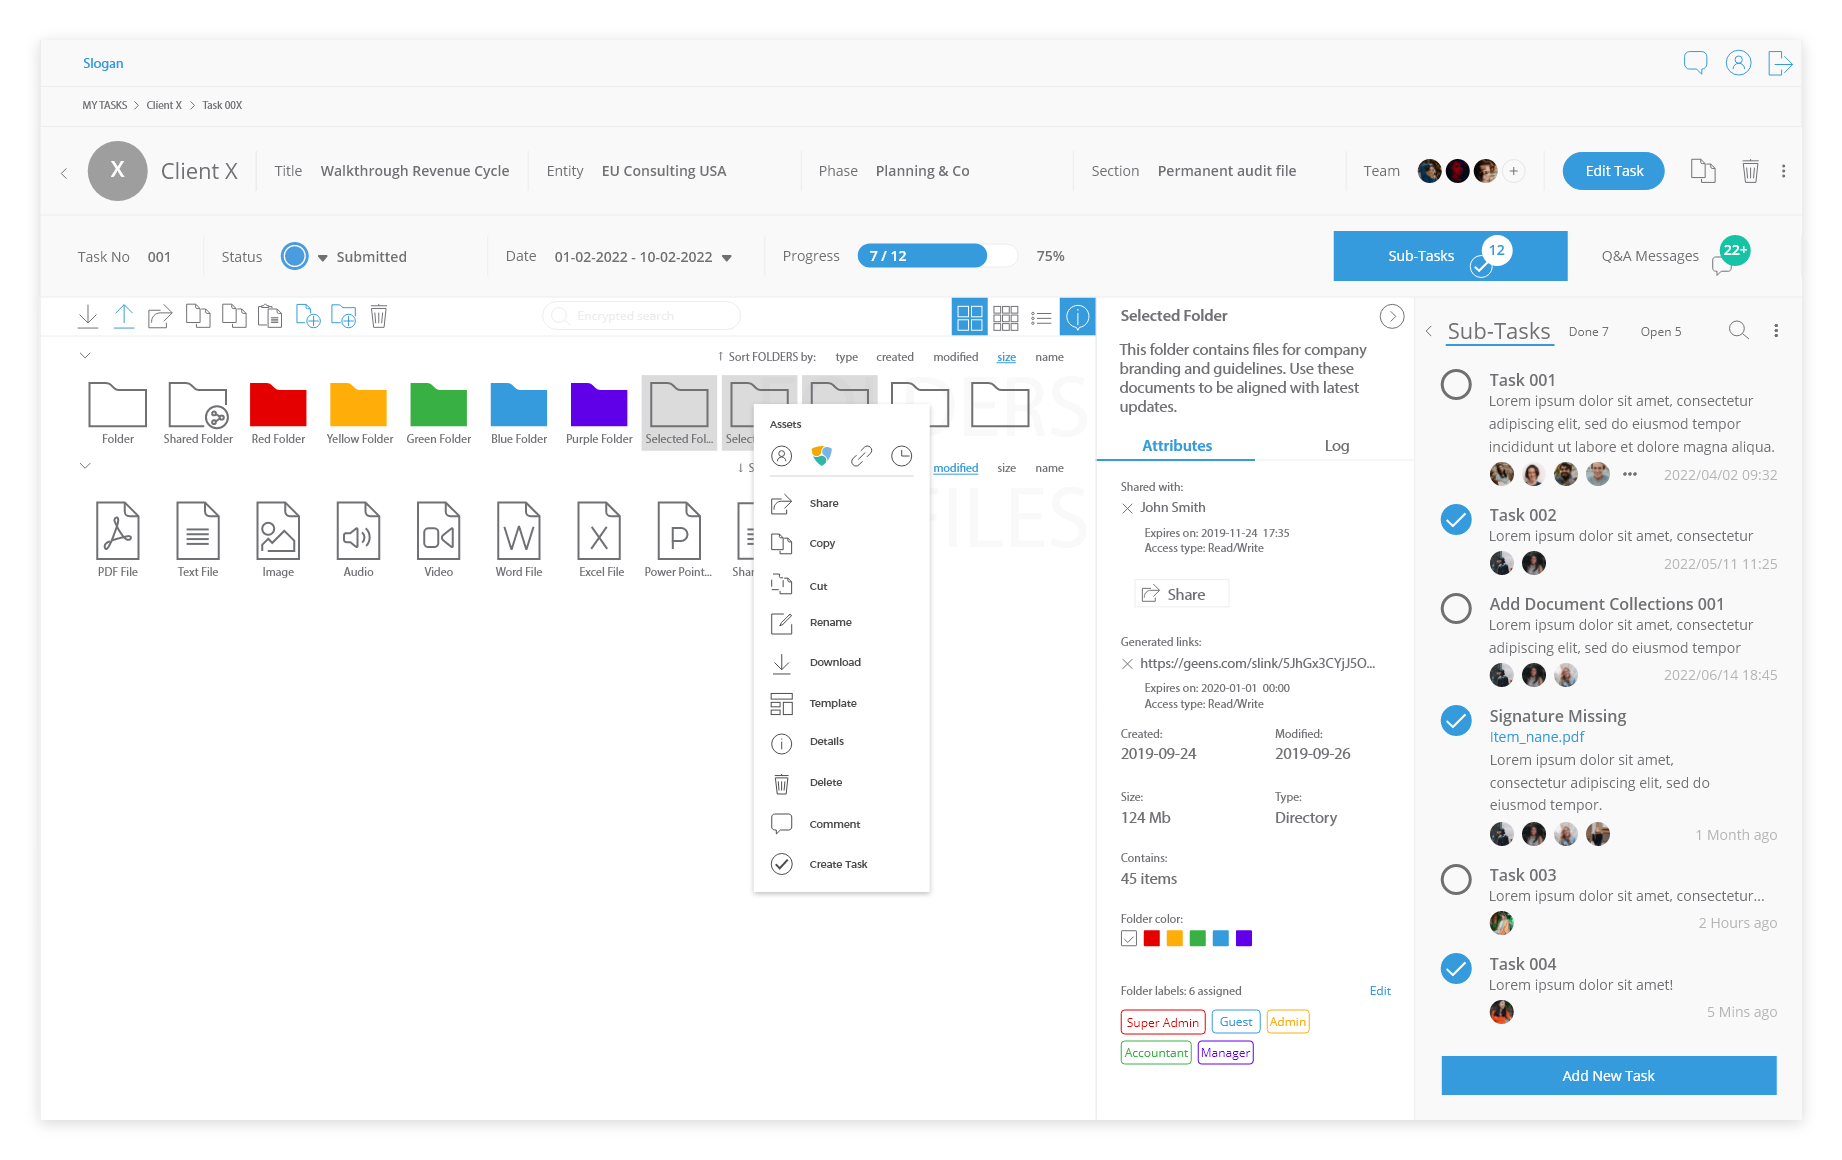
Sub-task and Q&A Messages overview tabs can be opened and closed as well as expanded. This improves the user experience and avoids dealing with too much information visible at once.
|
Example with Sub-tasks overview opened |
 |
|
Example with Sub-tasks overview expanded |
 |
SUB-TASKS VIEW
Sub-tasks work as a “task inside the task”. The sub-tasks have similar properties as the parent task.
| NOTE: The use of Sub-Tasks can be enabled/disabled in the Room settings. |
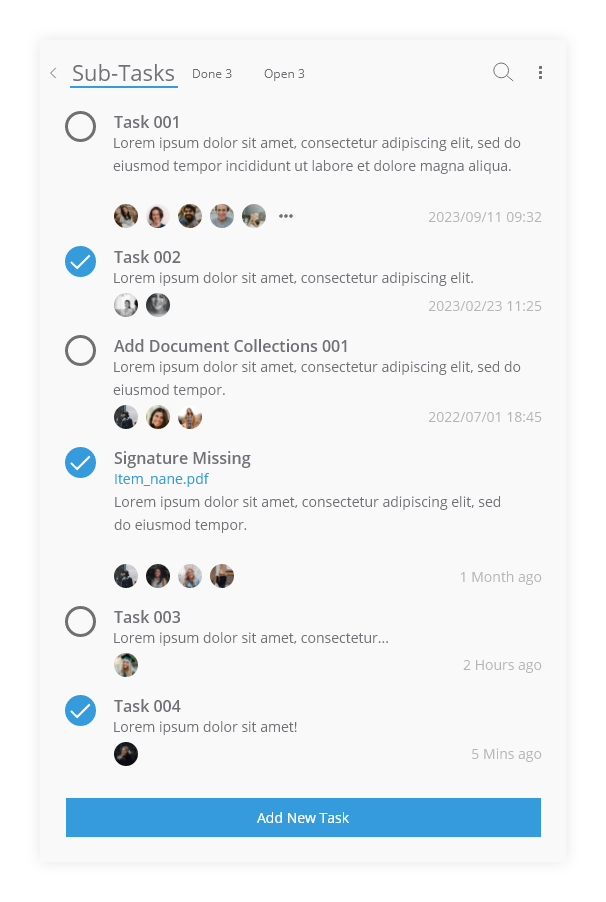
Users can be assigned to a sub-task.
An email will be sent and the notification will appear on the platform to notify the user about newly assigned tasks. Users can mark the sub-task as ‘completed’ by clicking the checkbox.
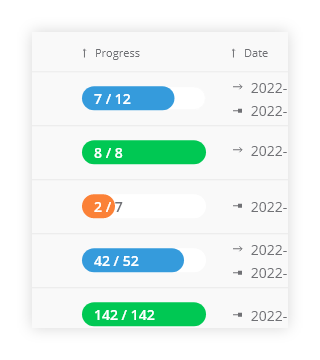
To monitor the progress of all sub-tasks, a progress bar with numbers closed from total is shown in the Room Cards, Task List and in the Task itself.
|
Room Card |
Task List |
Task Header |
 |
 |
 |
When the general setting Sub-task is enabled in a Room, this setting can be activated/deactivated per Task. This makes it possible within the Room to create parent Tasks that have sub-tasks and Tasks that only have a top level.
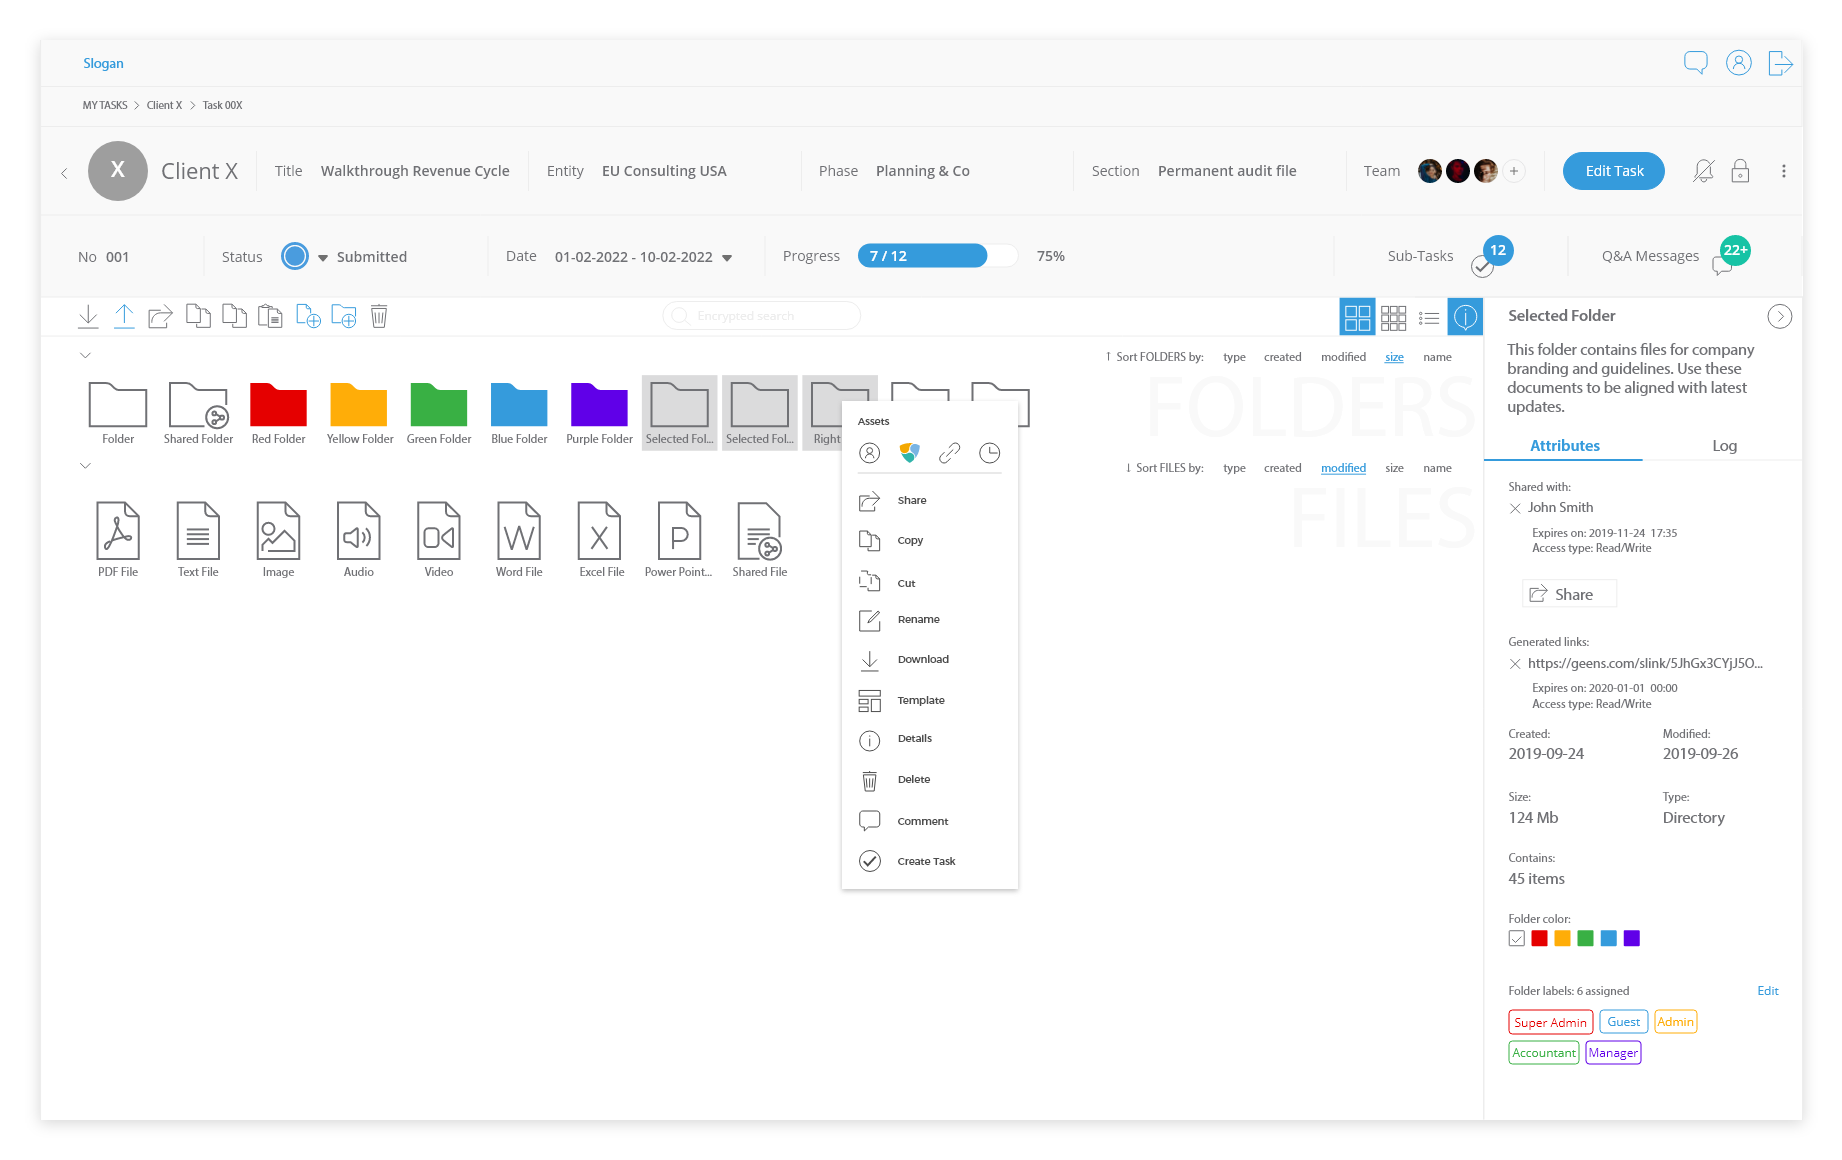
File item Sub-Task
It is possible to create sub-tasks on the file items. This is useful when based upon the current content of the file extra activities are required. E.g. after reviewing the uploaded file, it is noted the file is missing a signature or not complete. You can now create a sub-task linked to this file and assign a dedicated person to solve the issue.
File item sub-tasks can be created by right-clicking on the item: select ‘Create Task’.
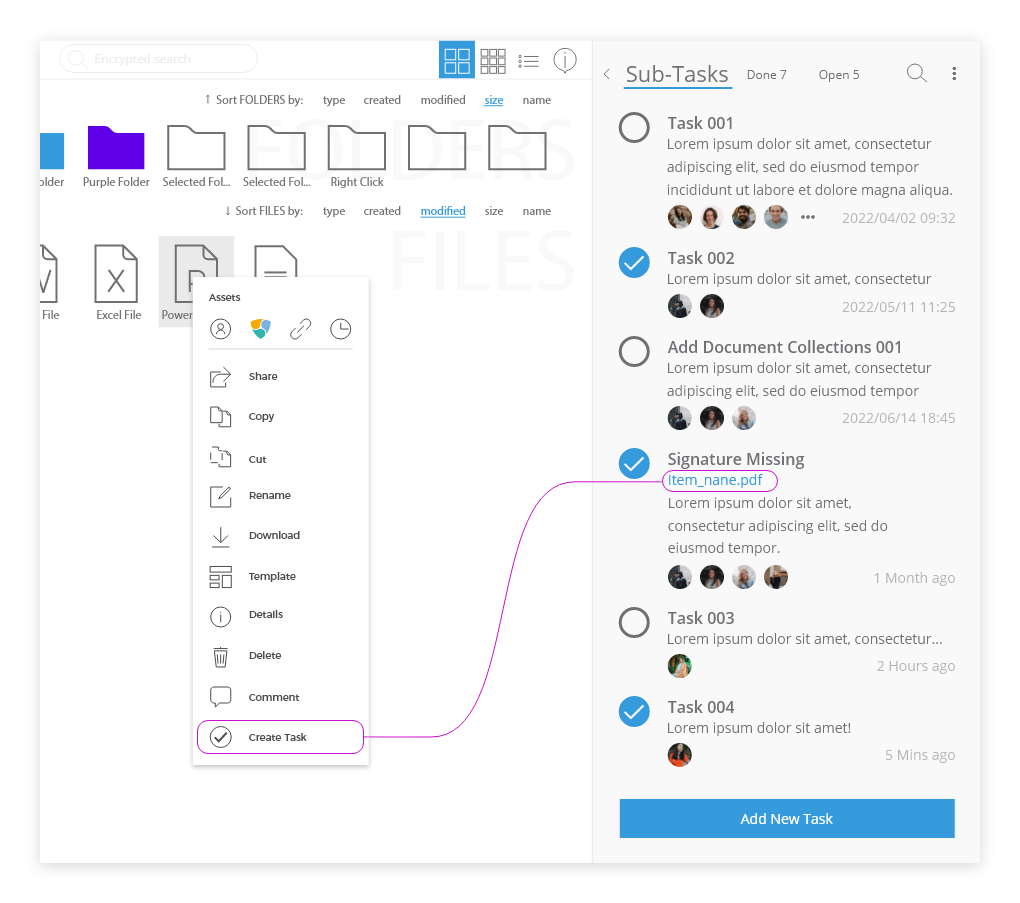
In the sub-task list overview, these sub-tasks have a link to the item that can be opened directly from the sub-task menu.
Q&A MESSAGES OVERVIEW
The Geens My Room has an end-to-end encrypted chat function. The Q&A messages are important to privately discuss issues amongst My Team and Client Team members in the room.
| NOTE: The enabling/disabling setting of Q&A Messages can be set in the general Room settings. |
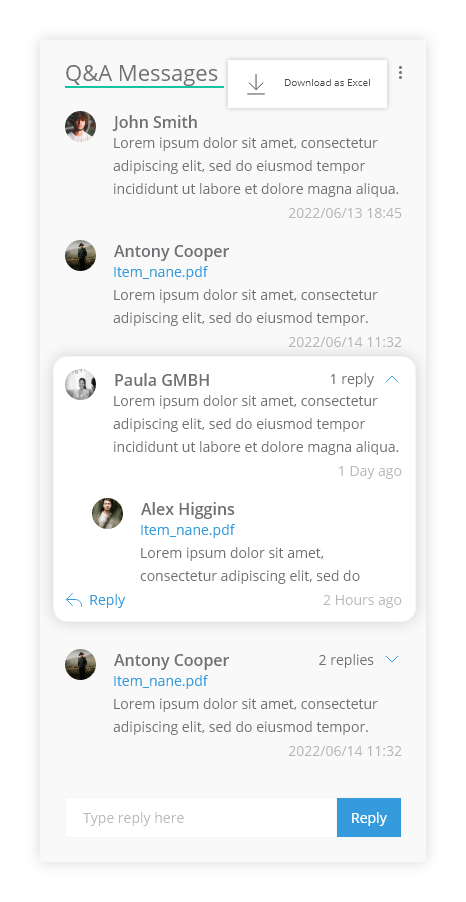
You can create a new Q&A Message tree by typing a message in the input field.
The first message will become a starting point/initial message.
All the answers/replies to that message will be stacked in groups under the initial question.
Each initial message will display the number of answers and can be expanded for a detailed view.
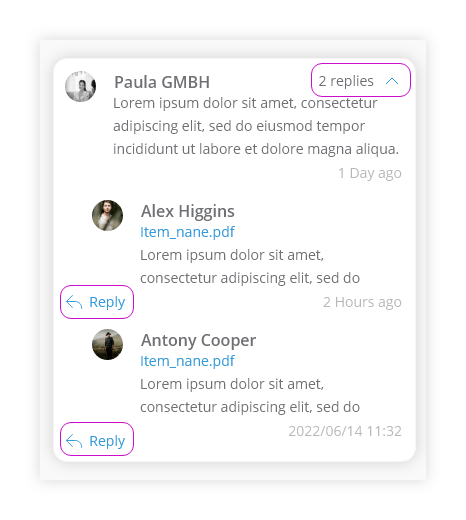
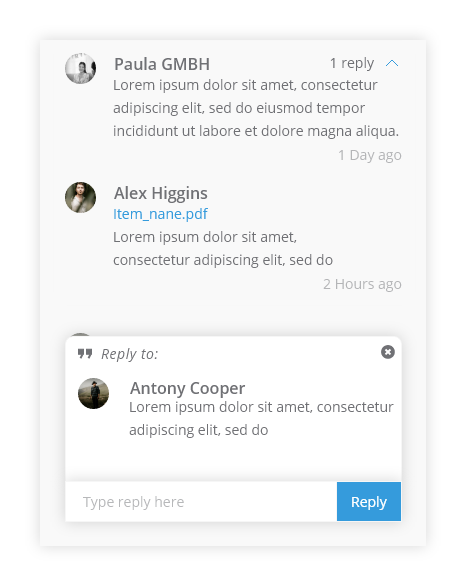
You can reply to messages by selecting reply.
When in the reply mode, the initial question will be visible while writing a reaction.
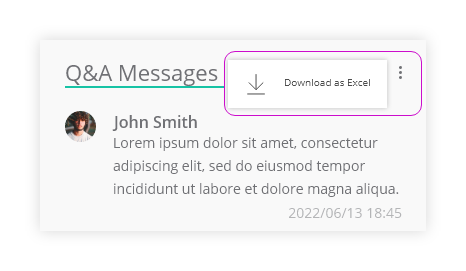
For accountability and archiving, you have the option to download a log file of the Q&A Messages as an MS Excel file. This spreadsheet will include Dates, Names, and Message Content structured in columns.
If the option Q&A Messages is enabled in the general Room settings, like the sub-tasks option, it can be activated/deactivated per Task.
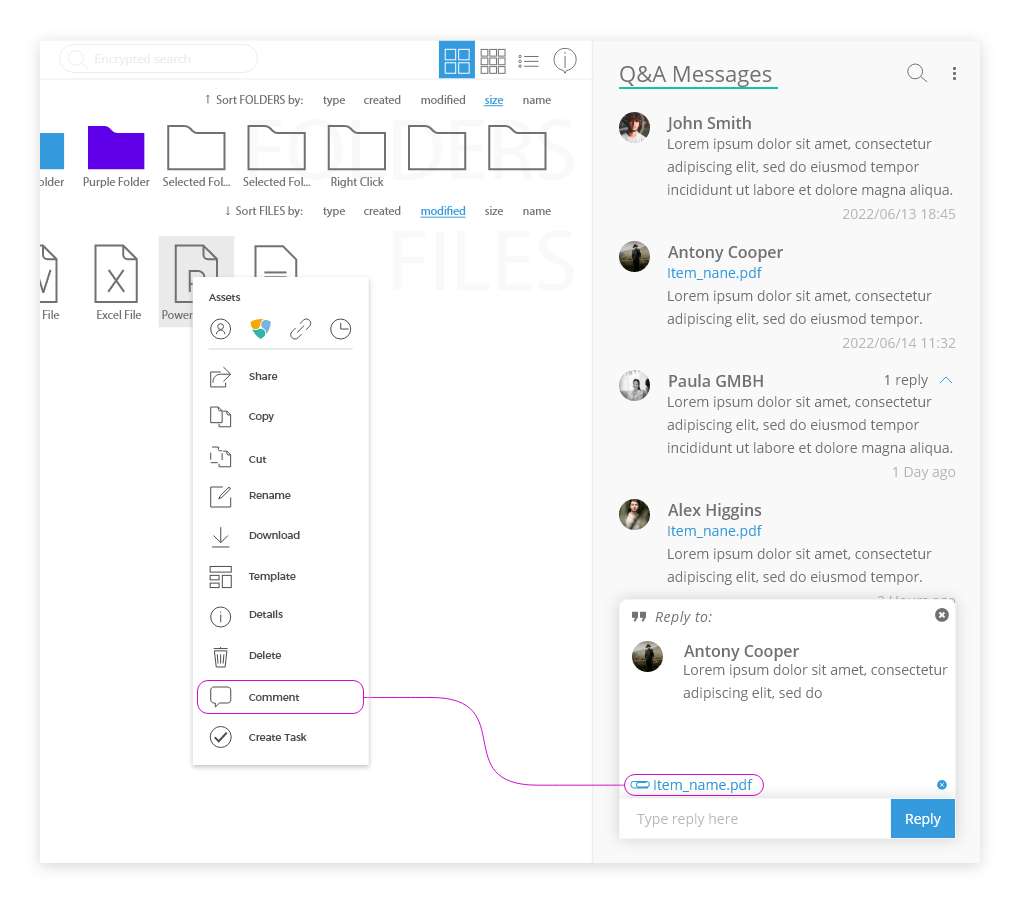
File item comments
It is possible to link comments to a file item. When after reviewing not everything is clear, one can add a comment to the item. E.g. the uploaded file is missing a signature or not complete, create a comment linked to this document and ask to solve the issue.
Item comments can be created by right-clicking on the item: then select ‘Comment’. All comments automatically become part of the Q&A messages overview and have similar properties and reply options.
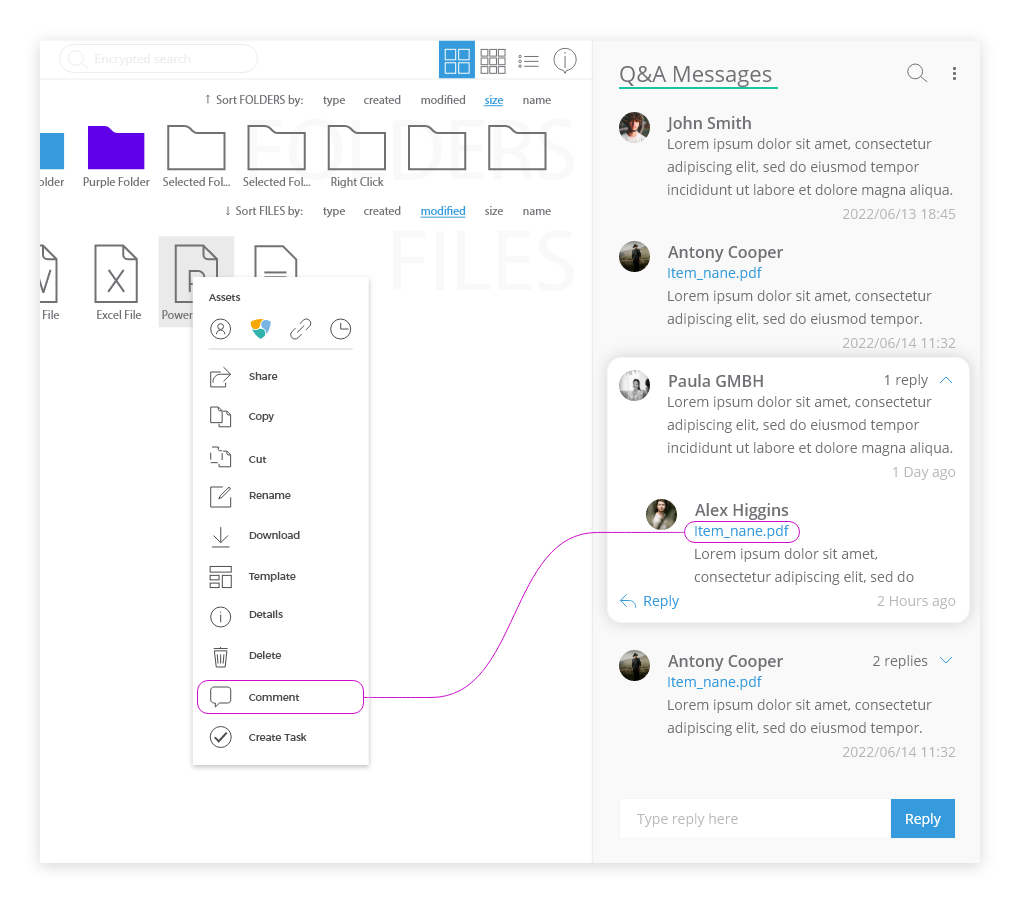
The Item comment / Q&A message will have a link to the file item that can be opened directly from the message.
| NOTE: File items can be added to any Q&A message. E.g.: a) While typing a Q&A message/reply. At any time, right click on a file item and select ‘Comment’. This will add a file link to the Q&A message. b) Start by right-clicking on an item and selecting ‘Comment’ and continue in the Q&A Overview. Either by creating a new message or clicking reply to make a reply containing the link to the file item. |
Notifications
Members will receive emails or/and notifications if there are changes in the room.
Notifications are generated by the following actions:
- Accepted Invitation
- Cancelled Invitation
- Created Sub-Task
- Room Deleted
- Deleted Task
- Deleted Sub-Task
- Task Status Change
- Invitation to Room
- Invitation to Task/
- Task Archived
- Task Locked
- New Q&A Message
- Room Setting Updated
- Task Settings Updated
- Sub-Task Updated
- User Added to Room/Task
- User Removed from Room/Task
Users can customize their notification preferences: the type of notifications they want to receive and also have the option to mute/unmute individual Rooms or Tasks.
The Dashboard notifications are displayed instantly when an event occurs. Email notifications are sent after 3 min. delay and only when the notification is not yet viewed in the dashboard.
Email notification settings
Set your preferences for the type of email notifications you want to receive by adjusting your General Email preferences by navigating to Settings -> Dashboard settings -> Get email notifications.
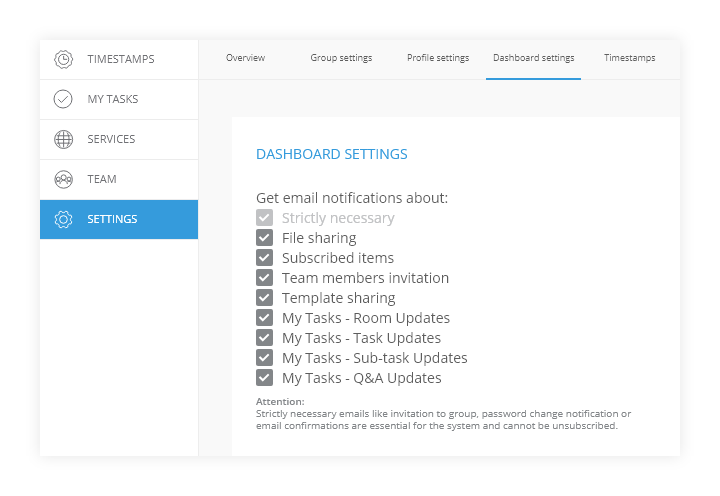 |
General email notifications are grouped by types and include all notifications correspondingly: Rooms, Tasks, Sub-Task and Q&A. These general settings will apply to all |
| NOTE: Specific rooms and tasks can be muted/unmuted in the room’s or task’s settings at will. |
Dashboard notifications
| All notifications are displayed in the drop-down list of dashboard notifications’ overview dropdown.You can navigate / take action on it directly by clicking on a notification in a drop-down list.This will open the corresponding room or (sub-)task. |
 |
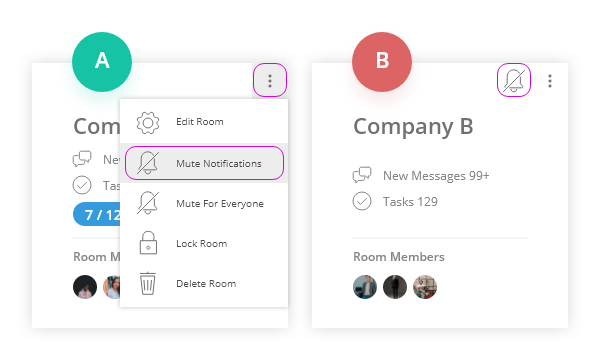
Individual Rooms / Task Notifications
All notifications from individual Rooms or Tasks can easily be activated/deactivated quickly in the Dashboard.
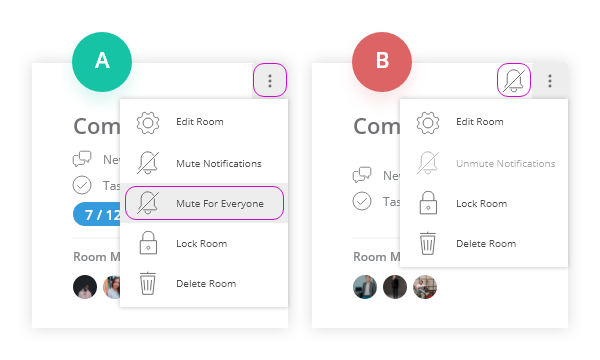
Mute Rooms by clicking on the three-dot “kebab” top menu icon and then selecting Mute/Unmute Notifications. Muted Rooms will have a strikethrough bell icon on the Room card.
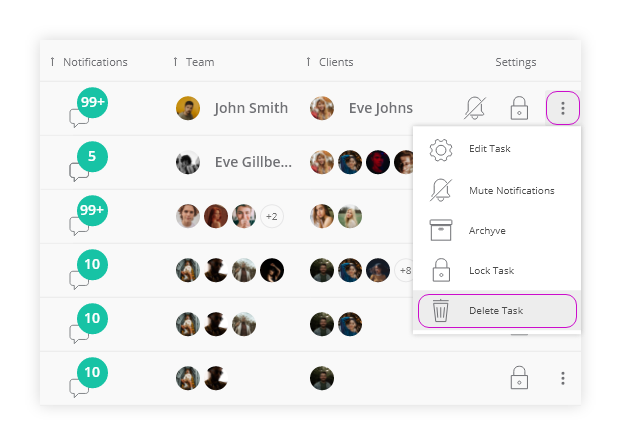
Mute Tasks by clicking on the three-dot “kebab” top menu icon of a task and then selecting Mute/Unmute Notifications. Muted Task will have a strikethrough bell icon in the task overview.

It is possible to mute Tasks in a batch by selecting multiple tasks and using the top toolbar for the batch action.
| NOTE: Batch toolbar will override any existing related setting. |

Mute For Everyone
It is possible to mute all notifications for all users in a room. This is useful when you want to make Room or Task adjustments or prepare tasks without unnecessary notifying or spamming users.
Only My Team users can use this setting (Client Team users cannot manage this setting). This is a separate user permission in the Team user settings named ‘Mute’. Only users with this permission can view and use the option in the room menu: ‘Mute For Everyone’.
When this option is enabled, the strikethrough bell icon is shown on the Room Card.
For all users without ‘Mute’ permission, the Unmute notifications option in Room Settings is disabled, until this option is unmuted by the Room’s ‘admins’.
Archive
With the archiving functionality, Tasks can be archived and placed in a separate archive list not to interfere with ongoing active tasks. All data is still kept in the Room and archived tasks can be edited while in archive mode.
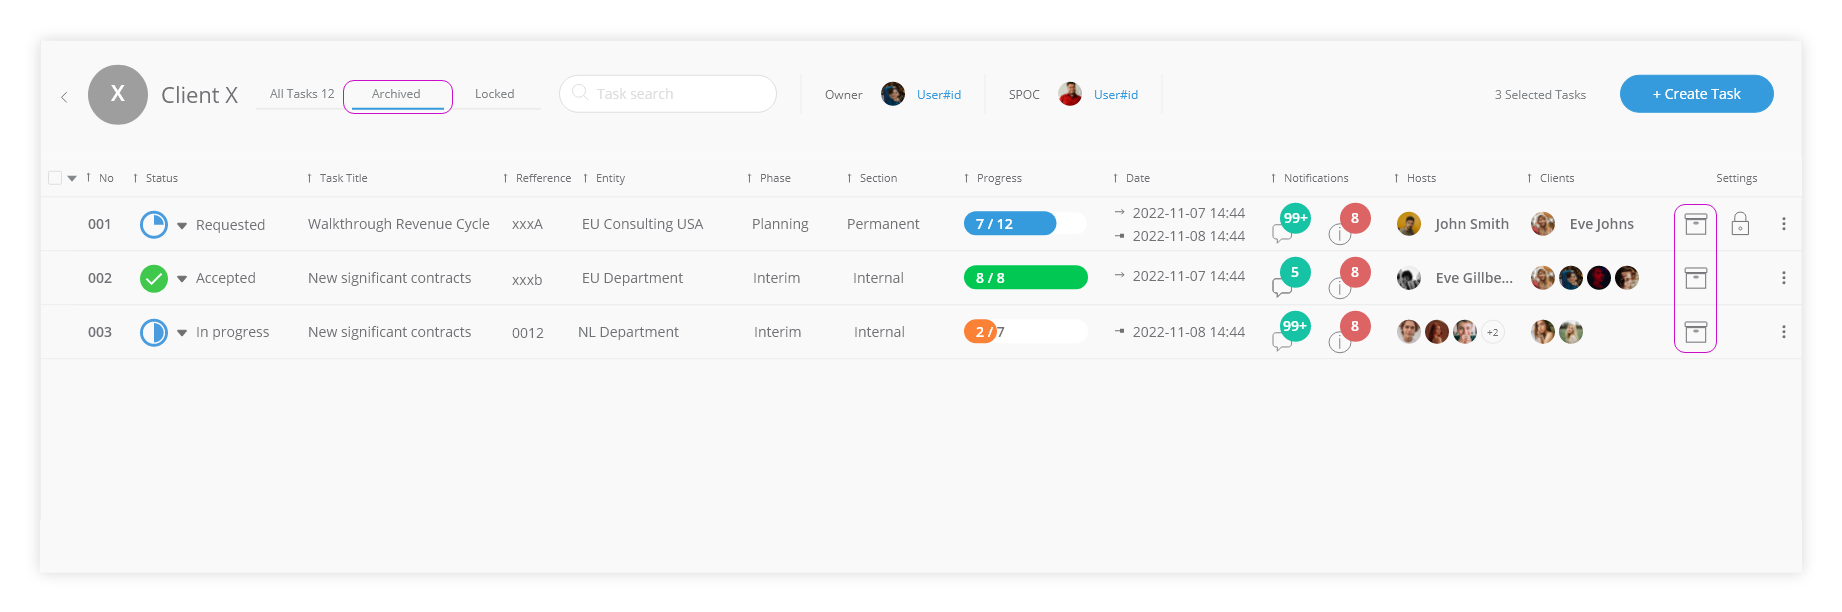
To archive/unarchive a task, click on the three-dot “kebab” menu icon and select Archive / Unarchive. Tasks can be archived in a batch by selecting multiple tasks and using the Archive toolbar icon for batch actions.
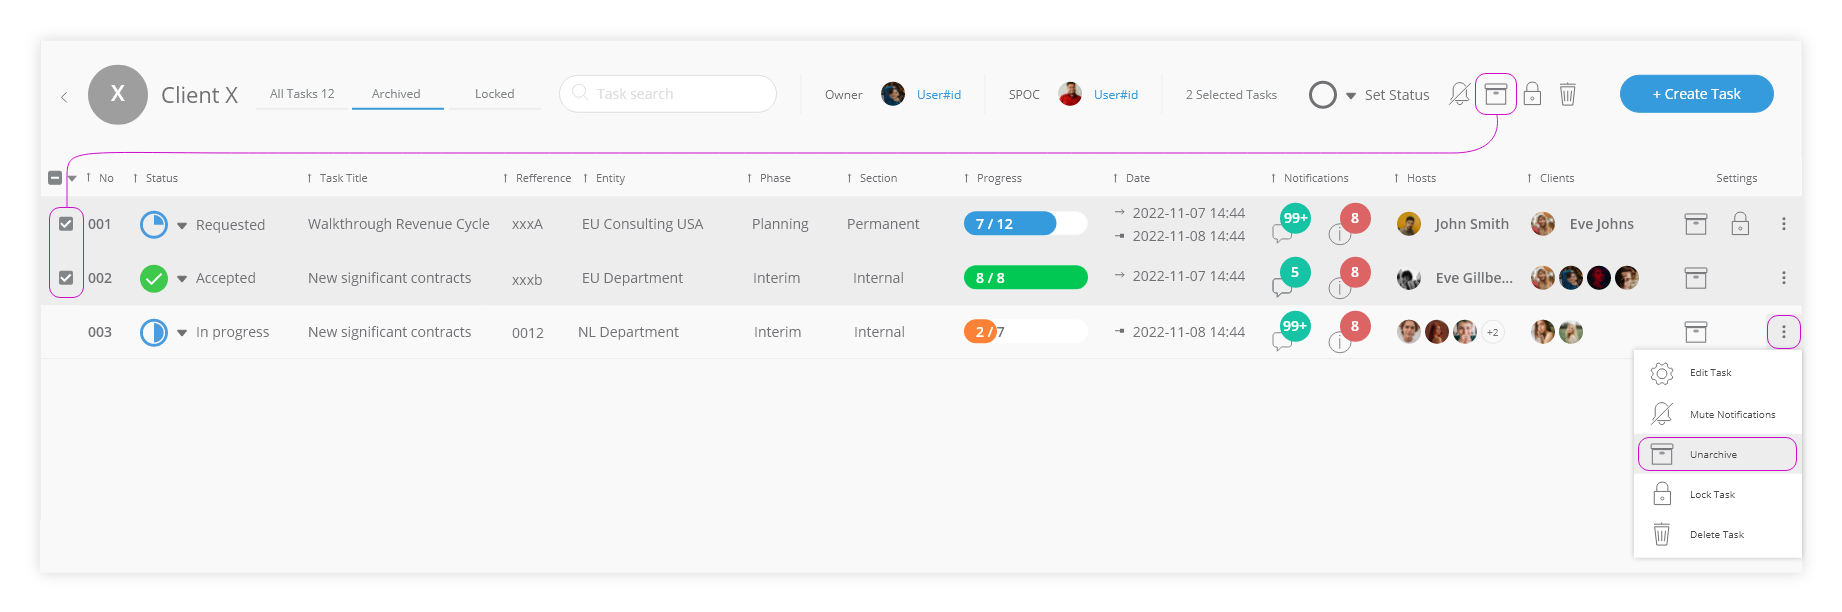
| NOTE: A Room permission for the user is required in order to Archive/Unarchive Tasks. |
Lock
With the Lock functionality Tasks can be locked and can no longer be edited, deleted or modified in any manner.
Locked Tasks cannot be entered until unlocked.
This option is important when you want to set the task to its final state and keep it unmodified/edited for later purposes.
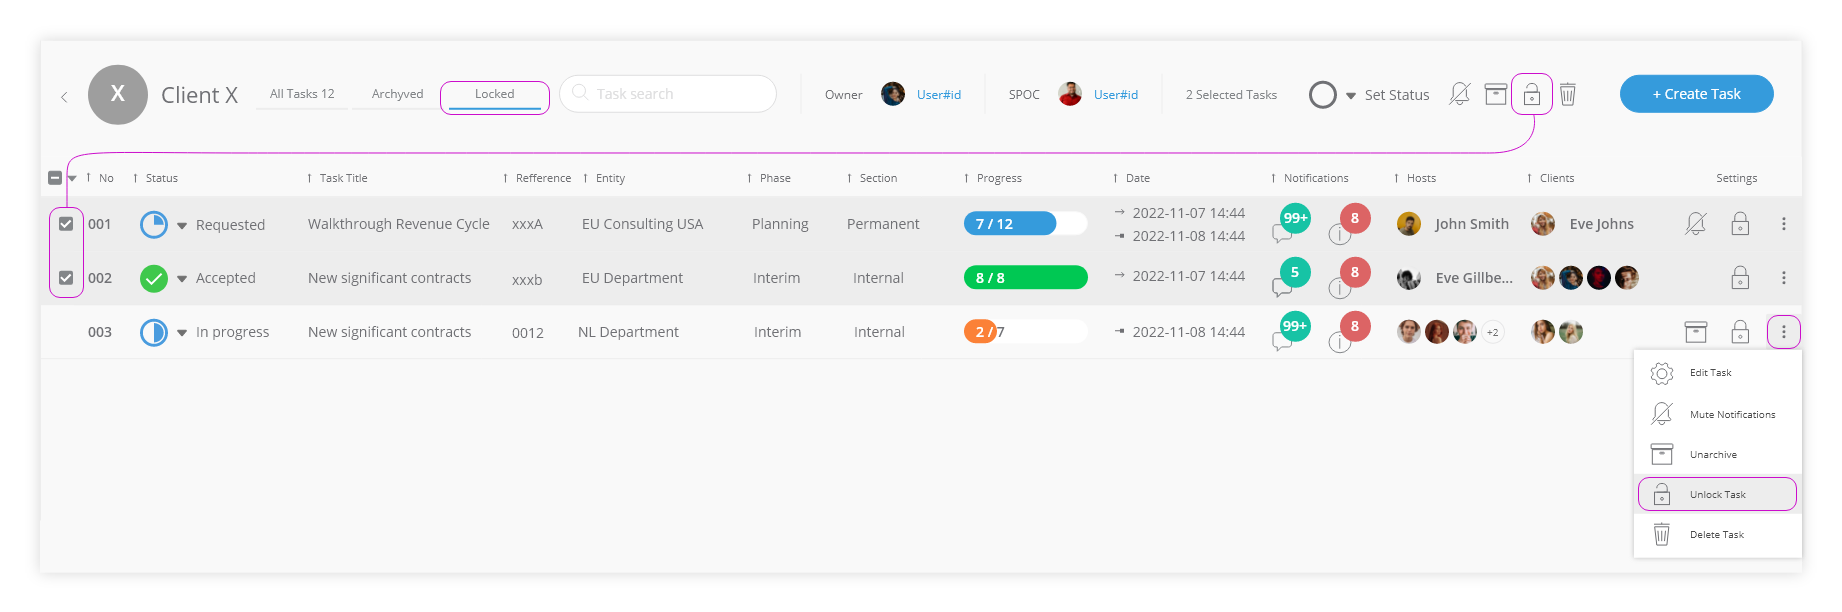
To Lock/Unlock a task, click on the three-dot “kebab” menu icon and select Lock/Unlock.
Tasks can be locked in a batch by selecting multiple tasks and using the Lock toolbar icon for the batch action.
| NOTE: A Room permission for the user is required in order to Lock/Unlock Tasks. |
Delete
Redundant Rooms or Tasks can only be deleted permanently. It is important to know that all the content, items, and metadata will be lost and cannot be recovered. The end-to-end encryption and privacy by design principles in the Geens My Rooms make it impossible to retrieve or restore deleted Rooms, Tasks or File Items from backups since no metadata to find the correct data exists.
Removed or deleted Users no longer have access to the Room, Tasks or files. Once a user is deleted from a Room, all uploaded files, Q&A messages and other metadata linked to this user are still kept in the room for accountability purposes.
| NOTE: A Room permission for the user is required in order to Delete Tasks. |
|
Delete Room |
Delete Task |
 |
 |
|
Batch Delete Room |
|
 |
|
Thank you
Feel free to experiment and customize your user experience to find the right formula for your use-cases and stay protected with the end-to-end encrypted cloud. Keeping your data safe and private is our aim. We will continue developing and pioneering new features and functions to serve our users.